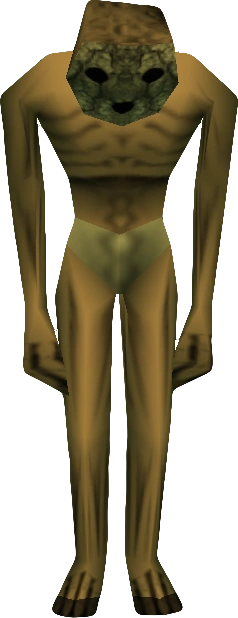
ReDead
UndeadIts scream paralyzes you; play the Sun's Song to freeze it, then attack freely.
Type Undead
Found In Bottom of the Well, Shadow Temple, ruined Market
Drop none
The full Ocarina of Time bestiary lists 56 regular enemies — every type, where you meet it, its weakness or strategy, and what it drops. Bosses are covered separately on the Bosses page.
💡 The Sun's Song trick
Its scream paralyzes you; play the Sun's Song to freeze it, then attack freely.
Dodge its huge axe swings, attack between them; its armor breaks off as it speeds up when hurt.

Block its sword with Z-targeting and counter; a jump attack staggers it for free hits.
It swallows and eats your shield and tunic; kill it quickly to recover the gear it ate.
| Deku Baba | Plant | Inside the Deku Tree, Kokiri Forest, Lost Woods | Slash with the sword as it lunges; cut the stalk to harvest a Deku Stick or Deku Nut. | Deku Stick, Deku Nut |
| Big Deku Baba | Plant | Forest Temple, Lost Woods | A larger Deku Baba; bait its bite then counter with a sword slash or jump attack. | Deku Stick |
| Deku Scrub | Plant | Inside the Deku Tree, Lost Woods, Sacred Forest Meadow | Deflect its spat Deku Nut with the shield to stun it, then attack as it flees. | Deku Nut, Deku Seeds |
| Business Scrub | Plant | Various grottos and dungeons | Reflect its nut with the shield; once stunned it stops fighting and sells you an item. | Deku Nuts, sells items/upgrades |
| Mad Scrub | Plant | Forest areas, grottos | An aggressive Deku Scrub; deflect its triple-shot nuts with the shield and strike. | Deku Nuts, Rupees |
| Keese | Flying | Caves, dungeons, Hyrule Castle dungeon | A single sword slash, boomerang, or slingshot drops these bats out of the air. | Recovery Heart |
| Fire Keese | Flying | Dodongo's Cavern, Fire Temple, volcanic areas | Kill at range or use a shield; their flames can ignite Deku Shields and burn you. | Recovery Heart |
| Ice Keese | Flying | Ice Cavern | Strike from range; their touch freezes Link solid, so avoid melee in tight spaces. | Recovery Heart |
| Skulltula | Arachnid | Inside the Deku Tree, dungeons | Wait for it to expose its soft underbelly, then slash; its armored back blocks attacks. | Recovery Heart |
| Skullwalltula | Arachnid | Walls in forest and dungeon areas | Knock these wall-crawling spiders off with the slingshot or boomerang before climbing. | Recovery Heart |
| Gold Skulltula | Arachnid (collectible) | 100 hidden across Hyrule | Kill it then collect its token; some need slingshot or boomerang to reach. | Gold Skulltula Token (Spider House rewards) |
| Big Skulltula | Arachnid | Dungeons (e.g. Forest Temple) | A larger Skulltula; hit its underside when it spins around to face you. | Recovery Heart |
| Stalfos | Undead | Forest Temple, dungeons | Block its sword with Z-targeting and counter; a jump attack staggers it for free hits. | Recovery Heart, Magic Jar |
| Stalchild | Undead | Hyrule Field at night (child era) | Two or three slashes each; they swarm at night and vanish at dawn. | Rupees |
| ReDead | Undead | Bottom of the Well, Shadow Temple, ruined Market | Its scream paralyzes you; play the Sun's Song to freeze it, then attack freely. | none |
| Gibdo | Undead | Shadow Temple, Bottom of the Well | A bandaged ReDead variant; Sun's Song freezes it, or use fire to ignite the wrappings. | none |
| Wolfos | Beast | Sacred Forest Meadow, Ganon's Castle | Sidestep its lunge and strike its unguarded tail; Z-target to circle behind it. | Recovery Heart |
| White Wolfos | Beast | Ice Cavern, Ganon's Castle | A faster icy Wolfos; dodge and hit its tail, then finish before it recovers. | none |
| Lizalfos | Reptilian | Dodongo's Cavern, Gerudo's Training Ground | Block with the shield and counter between its sword swings; fight them one at a time. | Recovery Heart |
| Dinolfos | Reptilian | Fire Temple, Ganon's Castle | A tougher Lizalfos that breathes fire; parry its swings and counter quickly. | Recovery Heart |
| Moblin | Humanoid | Sacred Forest Meadow, Ganon's Castle | Sneak up from behind to attack their backs; their spears outrange your sword head-on. | Recovery Heart, Rupees, Arrows |
| Club Moblin | Humanoid | Sacred Forest Meadow, Spirit Temple | A giant club-swinging Moblin; hit it from behind, as its frontal swing knocks you back. | Rupees |
| Octorok | Aquatic | Hyrule Field ponds, Lake Hylia, Zora's River | Reflect the rocks it spits back with the shield, or hit it with the slingshot/boomerang. | Recovery Heart, Rupees |
| Tektite | Insectoid | Hyrule Field, Death Mountain, Lake Hylia (water) | These hopping spiders are easy melee kills; blue ones skip across water surfaces. | Recovery Heart, Rupees |
| Wallmaster | Undead hand | Dungeons | Watch for its shadow on the floor and move away before it drops; it grabs you back to the entrance. | none |
| Floormaster | Undead hand | Forest Temple, dungeons | Defeat it fast; when low it splits into three small hands that try to merge again. | none |
| Like Like | Tubular | Gerudo's Training Ground, Spirit Temple, underwater | It swallows and eats your shield and tunic; kill it quickly to recover the gear it ate. | steals/returns shield and tunic |
| Beamos | Mechanical | Spirit Temple, dungeons | Its spinning eye fires a laser; bomb its base, as the eye itself is invulnerable. | none |
| Peahat | Flying plant | Hyrule Field, Sacred Forest Meadow | Wait for it to land and stop spinning, then strike the root; its blades hurt while airborne. | Recovery Heart, Rupees |
| Peahat Larva | Flying plant | Hyrule Field grottos | Small flying Peahat offspring; pick them off with the slingshot or sword swings. | Rupees |
| Guay | Flying | Hyrule Field, Lake Hylia, Desert Colossus | Crows that dive at Link; one slash or projectile each, easy to clear at range. | Rupees, Monster Claw |
| Leever | Subterranean | Desert Colossus, Haunted Wasteland sand | They surface from the sand and home in; hit them as they emerge before they multiply. | Recovery Heart, Rupees |
| Shabom | Bubble | Inside Jabu-Jabu's Belly | Floating bubbles; pop them with the boomerang or Deku Nut rather than the sword. | none |
| Bari | Jellyfish | Inside Jabu-Jabu's Belly | Large electric jellyfish; use the boomerang to split it into Biri before finishing them. | none |
| Biri | Jellyfish | Inside Jabu-Jabu's Belly | Small electric jellyfish from a split Bari; boomerang or sword them, avoiding their shock. | none |
| Tailpasaran | Electric | Inside Jabu-Jabu's Belly | Hit the head, not the glowing tail; the boomerang stuns it so you can land the kill. | none |
| Stinger / Shell Blade | Aquatic | Inside Jabu-Jabu's Belly | Hookshot or boomerang the floating Stingers; strike Shell Blades when their shells open. | none |
| Parasitic Tentacle | Organic | Inside Jabu-Jabu's Belly | Cut the colored tentacles blocking doors with the boomerang to clear the path. | none |
| Iron Knuckle | Armored knight | Spirit Temple, Ganon's Castle | Dodge its huge axe swings, attack between them; its armor breaks off as it speeds up when hurt. | Recovery Hearts (large) |
| Freezard | Ice | Ice Cavern, Ganon's Castle | Their icy breath freezes Link; melt or shatter them with fire, or hit while their breath recharges. | Blue Fire (in pots), Recovery Heart |
| Anubis | Spirit | Spirit Temple | It mirrors your movements; lure it onto a flame or hit it with Din's Fire / Fire Arrow. | none |
| Torch Slug | Insect | Spirit Temple, Fire areas | It ignites when it spots you; hit it before it bursts into flame, or use a single strong slash. | Recovery Heart |
| Dodongo | Reptilian | Dodongo's Cavern | Throw or feed it a bomb, or slash its tail; never stand in front of its fire breath. | Recovery Heart, Magic Jar |
| Baby Dodongo | Reptilian | Dodongo's Cavern | Small Dodongos that burst from the floor; one hit kills them but they explode on death. | Rupees |
| Armos | Statue | Dungeons, Spirit Temple | These statues animate and lunge when approached; bomb them or strike, then back away as they explode. | Recovery Heart |
| Bubble (Blue/Red/Green/White) | Flying skull | Dungeons | Flaming flying skulls; deflect with the shield to douse the flame, then slash, or use the boomerang. | Recovery Heart |
| Poe | Ghost | Kakariko Graveyard, Hyrule Field, ruined Market | Reveal it with the Lens of Truth, hit it to make it flee, then catch its soul in a bottle. | Poe soul (sell to Poe Collector) |
| Big Poe | Ghost | Hyrule Field (adult era) | Ride Epona and shoot it with arrows; bottle its soul to sell to the Poe Collector for a bottle. | Big Poe soul |
| Poe Sisters (Joelle, Beth, Amy, Meg) | Ghost | Forest Temple | Four colored Poes; track the real one with the Lens of Truth and strike each in turn, Meg last. | none (mini-boss) |
| Spike | Mobile spike ball | Dungeons | It curls into spikes when approached; wait for it to relax, or use ranged attacks to defeat it. | Recovery Heart |
| Flying Pot / Flying Tile | Trap object | Spirit Temple, dungeons | Pots and tiles launch themselves at Link; block with the shield or destroy them mid-flight. | Rupees, Hearts (from pots) |
| Blade Trap (Spike Trap) | Trap | Dungeons | Spiked blocks that shoot along grooves when you cross their line; time your dash past them. | none |
| Spiked-Log Trap | Trap | Forest Temple, dungeons | Rolling spiked logs in corridors; hug the walls or duck into alcoves to let them pass. | none |
| Skull Kid | Forest imp | Lost Woods, Sacred Forest Meadow | Hostile ones in the Meadow attack with darts; deflect or shoot them, though many are friendly. | none |
| Gohma Larva | Insect | Inside the Deku Tree | Hatchlings from Gohma's eggs; slash them before they mature into full Gohma during the boss fight. | none |
| Dead Hand's Hand | Undead | Bottom of the Well, Shadow Temple | Buried hands that grab Link to hold him for Dead Hand; break free and avoid stepping on them. | none (boss component) |